
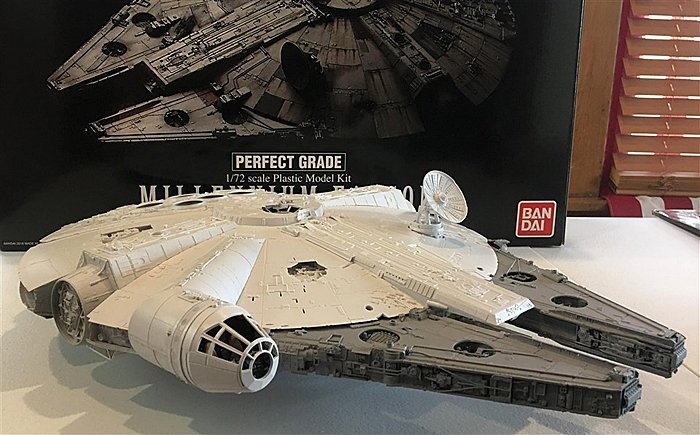
Over the past few months, I have had the pleasant experience of building and finishing the Bandai 1/72 Perfect Grade Millennium Falcon. Many others have reviewed this kit from box opening all the way through decal placement. This article will be less about that, and more about innovative ways to weather and paint the model without using expensive or hard-to-find supplies. I finished assembling my model in just over a month, working in short sessions each day. My working time probably added up to two to three hours a week.
The kit really lends itself to this kind of approach, with the assembly broken into manageable chunks. The instructions are very well written and documented with detailed pictures. The kit consists of 679 pieces. Familiarize yourself with the symbols indicating the ordered steps that appear on some pages. A couple of times, I got things assembled out of order and had to go back. I also kept a pen handy and marked off the parts as I assembled them, so to not miss any. Notably, there is one spare part in the kit. Part W3 is a spare, it is molded on the two W sprues but is only used once. I searched the manual for a long time for where I missed it. I didn’t, it’s a spare.
The Premium Edition of the kit contains photoetch parts for the engine vents, walkway vents, and cockpit tube. It offers a 12 LED light kit that is powered by 3 AAA batteries. The Premium Edition also adds a full set of water slide decals in place of the poly stickers included in the Standard Edition.
I have built both the Premium Edition and the Standard Edition. The only difference in kit parts is that the premium version uses two black plastic pieces in the cockpit tube to hold LEDs. These are not needed in the Standard Edition but are still there. The engine lighting frame is also included in the standard kit. This is nice because aftermarket or home-made lighting kits can still be installed in the Standard Edition. To do so, you will need 12 3mm white LEDs, some wire, and a battery box with a switch. It’s a fairly easy addition to the kit since it’s already designed into it. The block optic for the engine is cast in translucent clear in the Premium Edition, making the engine appear white. It is blue in the Standard Edition. I quite liked this, as I think the blue lighting looks better. I think there isn’t enough difference in these kits to justify the large price difference between the Premium and Standard Editions.
BUILDING THE COCKPIT


If you’re willing to take a few extra steps, both make a beautiful model.
I chose to complete the cockpit as ILM did and not install the plastic windows. In my experience, it gives the model a toylike appearance, and I wanted to avoid that. I painted the cockpit and gunner port interiors before assembly. When I was ready to paint, I placed masking tape over the gunner ports and on the inside of the cockpit frame. I then moved on to “the fun part”.
QUAD-CANNON WELLS


The plastic is a nice color of off-white, not far from the base color that I eventually used, but I wanted to be sure that my detailing would stand the test of time, so I primed my model with Tamiya’s fine surface primer in medium grey. I then painted the entire kit with Tamiya AS-20 Insignia white, which isn’t actually white at all, but a light grey with beige undertones. Once it was on, it made a perfect base for the paint and detailing. As I said earlier, the Standard Edition came with poly stickers in place of the Premium’s decals. I chose to not use those and to instead mask and paint the colored panels with my airbrush.
COLORING PANELS


For the tiniest decals, I bought an aftermarket set from a company that is sadly now out of business. However, the decals are available online for a small price.
I did quite a bit of research on TheRPF.com, and the group Everything Millennium Falcon on Facebook. I asked about the original colors used on the filming model and researched the best sources for the same colors. For me, finishing the model strong was a priority, because I doubt that I’ll get another chance to build it. I wanted to do it right. However, “doing it right” is kind of a subjective thing. I decided that I would try to mix my paint colors to match the original shades of paint that were used on the model. I found these online at TheRPF.com.
THE MANDIBLES


I chose to work one color at a time. To reduce handling, I chose to paint first on the upper hull, and then the lower. I masked off all the panels of each discrete color, carefully getting close to the panel lines. I used reference photos and applied Maskol latex masking fluid to each chipped panel. This allowed the base color to be preserved and gave the appearance of chips and damage. Once I was satisfied with the masking, I airbrushed my paint colors. The results were very good.
COLORING THE BOTTOM PANELS


After all the panel colors were down, I moved into the weathering phase. One of the Falcon’s most iconic features is its grimy, streaked, and charred surface. Without the weathering, it just doesn’t look right. I began by applying the streaks with my airbrush, spraying grey, black, and rust paint through a collection of hand-cut streak stencils I made from folded masking tape. Some panels have loosely masked variations made by just airbrushing overspray off the edge of a card. Regarding the location of the streaks and stains, I tried to stay as close to the filming model as I could. This process took the longest of any on this build. During the process, I took a ton of photos. I would compare them to the filming model photos and later make corrections to my work. In some areas,
BLAST MARKS AND HULL DAMAGE


I painted the model a few times to get it where I liked it. Other streaking techniques included using Tamiya masking tape to create a thin line of the exposed models and brushing in-ground pastels to make the streak mark. This worked very well and became my method of choice as I moved forward. I felt I had more control working with a small brush and tape than with the random nature of the airbrush.
A noteworthy fact is that the Millennium Falcon filming models are not painted in smooth solid colors. They are coated in a series of mists that mute and filter the colors from their original shades. I misted it with the base color, and a mixture called grime. It is a medium grey-brown.
It is important to remember that this model is yours to do as you please.
You will be its biggest fan and its harshest critic. Still, when I look at mine, I see areas where I could have done better. That’s just the nature of the hobby. I encourage you to persevere with your painting. Don’t stop until you’re happy with the look. The groups I mentioned earlier are full of great folks who will offer advice and teach you tricks and techniques that will help you. Observe the reference material. Really soak it in. You will use those same eyes to look at your own work. That comparison will be your biggest asset.
PICTURES OF THE FINISHED 1/72 PG BANDAI FALCON


Finishing this model has been a very enjoyable endeavor. I love the Falcon and all she stands for. Building this kit is the realization of my boyhood dream. After all, who wouldn’t want to spend their time on The Fastest Hunk of Junk in the Galaxy?
Thanks so much for reading. I want to extend a humble invitation to my Facebook group Everything Millenium Falcon.
If you like The Razor Crest as much as I do, I also want to invite you to my Everything Razor Crest Group.


Hi Mike, great article very helpful. I was wondering about the exhaust vents, did cut out the plastic and fit the photo etched parts as they are available for about $40.00. A bit of an expense I suppose but like yourself I have ordered the standard version as an extra $200.00 for some decals and a light kit is pretty steep.
Regards Ken Graham.