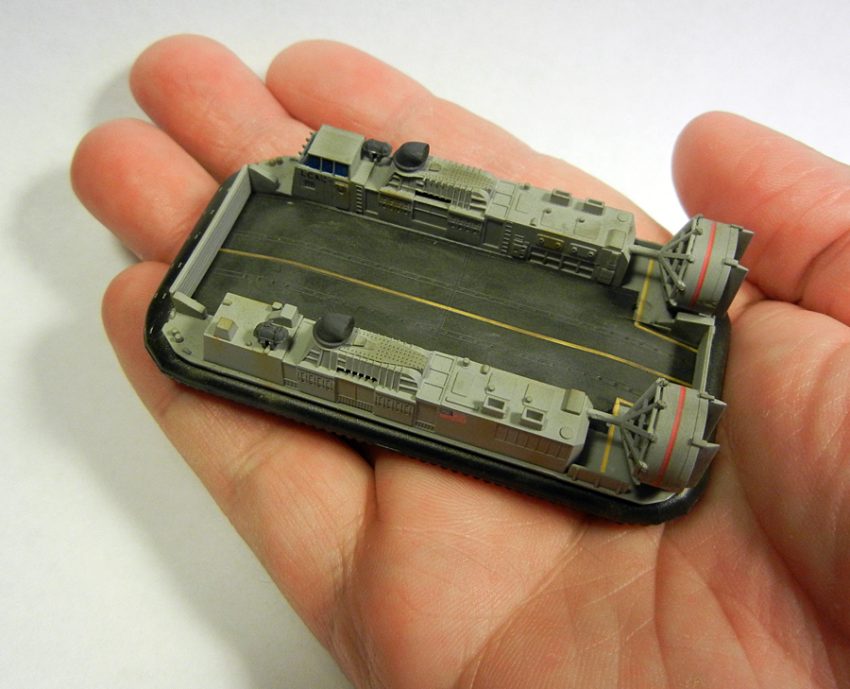
The Landing Craft Air Cushion (LCAC) is a class of air-cushion vehicle (hovercraft) used as landing craft by the United States Navy’s Assault Craft Units and the Japan Maritime Self-Defense Force (JMSDF). They transport weapons systems, equipment, cargo and personnel of the assault elements of the Marine Air/Ground Task Force both from ship to shore and across the beach. Concept design of the present day LCAC began in the early 1970s with the full-scale Amphibious Assault Landing Craft (AALC) test vehicle.
During the advanced development stage, two prototypes were built. JEFF A was designed and built by Aerojet General in California, with four rotating ducted propellers. JEFF B was designed and built by Bell Aerospace in New Orleans, Louisiana.
JEFF B had two ducted rear propellers similar to the proposed SK-10 which was derived from the previous Bell SK-5 / SR.N5 hovercraft tested in Vietnam. These two craft confirmed the technical feasibility and operational capability that ultimately led to the production of LCAC. JEFF B was selected as the design basis for today’s LCAC.
The Kit:
The 1/350 Gallery Models Landing Craft Air Cushion (LCAC) is part of a small collection of other subjects in the same scale released by Model Rectifier (MRC). This kit along with the others are pretty much related subjects, for example:
- CARRIER DECK EQUIPMENT
Item 64006
Scale: 1/350 - U.S. MARINES ARMOR ACCESSORIES
Item 64004
Scale: 1/350 - USS IWO JIMA LHD-7
Item 64002
Scale: 1/350 - USS WASP (LHD-1)
Item 64001
Scale: 1/350 - U.S. MARINES Aircraft
Item 64003
Scale: 1/350 - USN LCAC HOVERCRAFT
Item 64005
Scale: 1/350
I like the idea of a clear carded packaging, that way you can see the amount of detail and the quality of it. The model kits from Gallery Models are well molded for its scale with no flash whatsoever.
Open the package carefully, it is your assembly instructions on the inside and the back has the decal and color guide in Mr. Hobby, Vallejo, Model Master, Tamiya and Humbrol equivalents (Kudos to MRC for this detail). Assembly of the kit is very straightforward and fit is 1st class.
I painted pretty much both kits straight on the sprues and then pieced them together. There is no way you can glue parts where they don’t belong, especially the main structure because they simply wouldn’t fit.
Painting & Decaling:
I used what I had available. The main structure was painted with Tamiya XF-19 Sky Gray, XF-24 Dark Gray on some details, XF-1 Flat Black for the ‘rubber ‘parts coated with Semi-Gloss Acryl coat. The cargo area was painted with Tamiya NATO Black XF-69 and the windows were painted with Tamiya Transparent Blue X-23.
Don’t sweat it if you paint the frames while painting the windows. You can go back with a dry brush of the base color (XF-19 in *my* case) and bring the frames back to life.
Decals are very thin and will go on with the proper tweezers fairly easy. Note that I didn’t gloss coated the surface prior to decals. I lay a small puddle of Micro Scale Decal Solution and viola! That saves me some time and there is no ‘silvering’ to worry about. After placing all the decals, all the structure was coated with Model Master Acryl Flat.
Then it was assembled to the ‘rubber’ section of the model; buy why? Because the rubber had a ‘wet’ look achieved with Semi-Gloss Acryl. So coating the structure Flat saved me from masking the semi-gloss area. Weathering was achieved with Tamiya Weathering Master Sets.
These kits are a joy to build, either as a relief after a big build or as a weekend project. MRC states that these kits are suited for ages 14+ and I have to disagree. Definitely due to the low parts count and easy fit, I would recommend these kits to young modelers as young as 10 years old with some adult supervision. But make no mistake, these are not snap kits either.
For the scale they have very nicely detailed and I will dare to say that there is still room for some scratch built add-on details.
They will go very nicely with a 1/350 USS IWO JIMA LHD-7 or even as a stand alone kit on a small vignette. The Gallery Models 1/350 LCAC will give the modeler of any age a few hours of fun for just $11.95 USD.
Highly Recommended!
Review Samples courtesy of my wallet.


