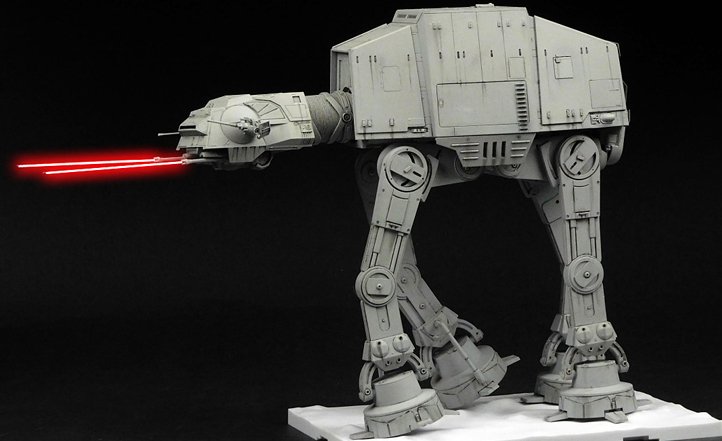
AT-ATs drove the Empire’s assault on the Rebel base during the Battle of Hoth. The gigantic combat vehicles were air-dropped onto the snowy world, where they marched toward the command center and were met by Rebel defenses. Snowspeeders first attempted to blast the AT-ATs, but the walkers’ armor proved too strong. Commander Luke Skywalker ordered his squadron to use harpoons and tow cables, tying the legs of the hulking transports.
Though this tactic proved effective at toppling a walker, the Rebels were ultimately unable to stop the Empire’s advance. General Veers, leading the surface attack, targeted and destroyed the Rebel base’s main power generator. Imperial forces, along with Darth Vader, entered the base — though most Rebels had been able to escape.
- Highly detailed plastic pieces molded in different colors
- Snap together design
- Fallen state display option
- Possable legs
- Possable cannon
- Laser effects thru clear red parts
- Hatch interior details
- Cockpit and seated pilots
- Joint and piston reproduction
- Clear viewport
- Connectable display base
- Sticker or waterslide decals
- Clear Illustrated instuctions
- MSRP: $49.99 USD
- Street Price: $41.99 USD
Thanks for making it to this entry. If you’re here, you came to see this Bandai AT-AT Walker Kit. # 0214476-4200. As we are aware, there’s not much to see on this build than you as a reader haven’t seen posted in other sites or Facebook fan groups.
BUILDING BANDAI’S 1/144 AT-AT WALKER
The Bandai AT-AT Walker model kit is a wonderful master piece from the folks that brought us Gundam. There are obvious signs that the folks at Bandai did a wonderful work researching the actual filming miniatures. Wishing this kit was in a larger scale like the old AMT and Revell Snap Tite AT-AT. This AT-AT however at 1/144 scale has crisp details even on those less visible areas. One can even identify the original parts used on the filming miniature on this kit.
1/35 Panther Sd.kfz, 171 Aust.A
1/700 Scharnhorst
1/35 Tamiya Kampfpanzer Leopard No.35064
1/35 Tamiya flakpanzer gepard No.3599
1/35 Sdkfz 232 (8rad)
1/35 British 25PDR. Field Gun
1/35 Tamiya Sd.Kfz Leichter 222
1/35 Churchil Crocodrile
1/144 Apollo Saturn V
These parts above are pretty much there in the belly of the model kit. Bandai also did an excellent job with the articulation of this model and it can be posed even as ‘fallen”.
In all seriousness, with some tweaking one can make a short stop motion sequence using this kit and I wish I had the time. The instructions are very clear and straightforward. To add more finesse to the kit, Green Strawberry provided us with their beautiful photo etch set 03117-1/144. The chin guns and rear back plates will be replaced with this set for a more ‘in-scale’ look. Note that the lower back plates on this build were used exposing the mount side. That was no mistake and done on purpose because *I* felt that the square mount added more detail to the already busy walker’s behind.
If you want the ultimate AT-AT, I highly recommend the
Green Strawberry photo etch set 03117-1/144. I even modified slightly their part 19 so I could display the AT-AT with the maintenance hatch closed. Otherwise I would had to keep it open full time.
To paint the Bandai 1/144 AT-AT model kit I used a home brew mix of 50% Tamiya XF-2 and 50% Tamiya XF-19 Light Grey. It finished with a lighter than expected grey but it will tone down as soon as you do the weathering. I did use a pin wash with AMMO by Mig Starship Wash A.1009. The wash was very diluted to keep the scale of the model in place. Because most of us know that the styrene used by Bandai isn’t friendly with enamel washes, I used instead some pre-shading with my airbrush and different shades of grey pastels either free hand or with Tamiya Masking Tape for the long streaks on the sides.
It did cross my mind to illuminate the cockpit but then I changed my mind considering the time allotted to build this model. Being a Snap Kit, I can always come back later and do it.
This was a very pleasant build in general and the fit of the photo etch was spectacular. We never got to see the mythical 1/35 Dragon AT-AT Walker but this Bandai makes up for it big time!
My sincere thanks to the folks at Green Strawberry for providing us with the photo etch set. Also many thanks to Ammo by Mig for providing our studio with their great and latest weathering products.


Muy buena maqueta. me gusto lo facil que es de ensamblar pero ojo, puede confundir en algunas partes de sus patas.